Sunday, December 13, 2015

Ed - Raspberry Pi "Entertainment Director"

So, I've been wanting to build a Raspberry Pi "box" for a while.  This one, in particular, is built for portability and travel.  The idea is to put the Raspberry Pi into a box that has all the necessary components and can run off of 12V or 110V, with ports for both the van's RCA Aux inputs as well as HDMI for when we get to our destination, be it a hotel or whatever.

Originally I had planned to enclose it i one of those carpeted speaker boxes you can get from an audio supply store or Best Buy etc., however with the minimum price being $50+ for it, I decided to go another way.  Hobby Lobby shleps all good cheap and cool items and digging around there I found this for $12;


So added in the following components;

  • Raspberry Pi 2 (with 32gig card).
  • 10 port, 12V, Powered USB hub.
  • USB extension cables to round external ports on the side of the case.
  • HDMI extension cable to side of the case.
  • Power extension to side of the case (home-built with cable and port scavenged from old router).
  • Super Nintendo knockoff USB joysticks, USB wifi card, etc.
  • 1TB USB drive
Now the system is setup to dual boot, going from RetroPie (old game machine emulator with roms) to OpenElec to watch movies etc. that have been loaded to the 1TB hard drive.  The system also creates a wifi hotspot in the van - allowing kids to connect up their tablets and game together in minecraft etc.  Big first test is coming up for this system, but so far so good - driveway testing passed!  Here are a few more shots of Ed.


Wednesday, October 14, 2015

Radio Cabinet Restore

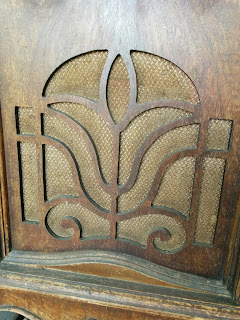
So this is a 1930's Coronado radio cabinet.  I got this from a guy who was liquidating his uncle's radio collection after he passed.  He had literally hundreds and hundreds of radios in barns, sheds, house, etc.  This particular one, I have a special "modern technology" update I'm doing to it.  Before any purists call me out on this - it has NO chassis, and the cabinet itself was very close to "firewood" as far as shape and dryness.  By the way, Coronado radios were a store "house" brand for Gimbels department stores.  Anyone remember them?

Ok some "before" shots;


And here is after wipe down with mineral spirits and stripping with lacquer thinner (I have since gone back and got more out of the nooks and crannies with a small brush as well);


And that's where it sits now.  I have some toned lacquer on order so I hope to spray it very soon.  I'm leaning towards opaque toner for the top, edges and bottom, and the more translucent kind (slight lighter in color) for the front and sides.  We shall see how it turns out - by far not a "showroom quality" piece to be sure, but hopefully it will be at least presentable at the conclusion of this.

Ok, got a little more time, sanded more of the top and then shot it with shellac clear sanding sealer and then 6 coats of Mohawk medium dark toner lacquer - here is what we got;


Here is after I did the main body with Mohawk Ultra Medium Walnut and before clear coats. Got a shiney spot on top where I had to do some touchup - not sure how that is going to work out yet.


And just to cause longer page loads, here is a couple shots after clear was put on;


Tuesday, May 5, 2015

Headlights and Crest Toothpaste

Well, I had heard toothpaste can help clear up a foggy headlight.  You know the sun-faded deal that makes your car look 10 years older than it really is!  Amazingly enough, it works!  I took my nieces car and tried it out - here are the before and after pics;

The "before" shot.

Secret weapon, damp paper towel and toothpaste!

Another "before" shot.

Did circular motions with the crest with steady firm pressure.


Front complete - top of headlight NOT done yet to show contrast.

Another angle showing front done and top not started.

Top "before".

and DONE!


Quite a difference!!  Not perfect by any stretch, but quite an improvement overall.  I've also done the technique with buffing compound and Novus polish etc. and that is better still than this.  However for 10 minutes work with Crest toothpaste and some wet papertowels - this is worth doing!